The
Nintendo Entertainment System (NES) is a great system
that was plagued with one small problem: cartridges
didn't always want to work right away. While
this problem was remedied with the top load NES 2,
most everyone has the original front loading model.
For many people who own a NES (or for those who just
bought one from stores, E-Bay, or where ever), the
typical solution of cleaning the cartridges or the
deck may not seem to be working anymore. What
this document intends to show you is how to breathe
life back into your NES so you may be able to actually
enjoy playing it, rather than cursing at it when a
game doesn't load.
NOTE: This
document describes how to recondition the original
(Front Load) NES deck and the original controller
pads. While the methods shown in this document
are tried and tested, the author and Good Deal Games
are not responsible for any damages you may cause
to your equipment and cartridges. Proceed at your own risk!
STEP
ONE CLEANING
CARTRIDGES: Before we begin ripping apart equipment,
lets start with the basics: cleaning you cartridges.
Most of your problems are almost always dirty
cartridges.
Like your mother always said when you brought
a stray animal home or perhaps spied a candy on the
floor that you wanted to eat: You dont know where
its been.
When you buy ANY used cart, clean the contacts
really well as the dirt can rub off onto the decks
cartridge connector.
You can use the instructions
for cleaning the cartridges (located in the Articles
section) or you can use swabs and solution from a
game cleaning kit (I recommend Nintendo brand cleaners,
which can be found at various places including Nintendo). Make sure the contacts are dry before
you shove the game into the system.
Another way
to clean the cartridges is to take them apart and
wipe the contacts with a cloth dipped in isopropyl
alcohol/water mix.
Usually cotton swabs work, but they sometimes
can leave cotton bits that get snagged by the plastic
or metal. The
only way you can get the carts apart though is by
using a .38 mm Security Bit.
They are available and you can find them on
auctions or electronics parts catalogs. Game accessory companies did release things
called game keys that are basically the same thing
as the Security Bit.
If you do have such a tool, please perform
the following:
·
Remove
the 3 (or 5) screws from the back of the game cartridge. Put them aside where you wont lose them.
·
FOR
3 SCREW CARTS: open the cart from front to back (like
a door), as there are two tabs at the top (where the
game title is shown) that act as a hinge. FOR 5 SCREW CARTS: just pull the back
off.
·
Remove
the circuit board from the cartridge and place it
on a stable surface (like a table).
·
Lightly
wet a dish cloth (or a cloth that isnt really fluffy
to reduce snagging on the metal of the board) with
a 50% isopropyl alcohol/50% water solution and rub
the contacts, making sure to travel in the same direction
as the contacts. Then with the dry part of the cloth, rub
the contacts again.
Repeat until dirt no longer appears on the
cloth.
·
Flip
the board over and repeat the cleaning process as
shown above.
·
Place
the board back into the front piece of the cartridge
case (the side with the full label) with the chips
facing the casing (so all you see are a bunch of little
prickly points facing you).
In fact, there is really only one way the board
fit will fit, so you should have no problems.
·
FOR
3 SCREW CARTS: hook the tabs on the top of the back
piece of the cartridge case into the two slots on
the front piece of the case (which are also at the
top) and close the cartridge as you would a book. Replace the screws. FOR 5 SCREW CARTS: Line up the screw holes
and replace the screws.
DECK: If cleaning the
cartridge doesnt seem to work, then the next thing
you can do is clean the deck.
The easiest way is to use a cleaning kit, which
looks like a NES cart but it has a cleaning piece
where the contacts would be. From personal experience I STRONGLY recommend
using the Nintendo brand cleaning kit. I used 3rd party cleaners and
it sometimes seemed to make things worse while I had
never had problems with the Nintendo brand.
If you like other brands, hey, thats fine.
Just passing along the experiences.
You can also opt to remove the connector from
the machine and give it a good scrubbing, but Ill
cover that in the Refurbishing section.
CONTROLLER: Theres not much
you can really do to clean the buttons without taking
the thing apart.
If the outside is dirty, you can lightly spray
a rag or paper towel with common kitchen cleaner or
even window cleaner and then wipe the controller off. Dont saturate the cloth or get the chemicals
inside the controller, though.
STEP TWO REFURBISHING
BEFORE WE START: You will need
the following tools in order to take apart your NES
deck:
·
Medium
Phillips screwdriver: the shaft of the screwdriver
should be roughly 3 inches in length, just so long
as the handle doesnt butt up against the bottom of
the NES deck.
·
Precision Flat-Head
screwdriver: It usually comes in a five pack of precision
screwdrivers.
·
Open
working surface: kitchen table, desk, etc.
FOR
CLEANING CONNECTOR FROM THE DECK
·
Non-metal scrub
brush: the kind you use to scrub your nails or dishes
or something. CANNOT BE METAL!
·
Towel:
to, well, help dry it.
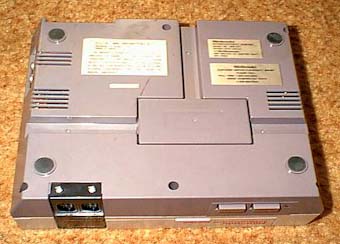
DECK: Perform
the following to take apart the deck to clean and/or
refurbish the system. Disconnect the power supply, controllers,
and TV connections from the deck.
·
Remove
the screws from the bottom of the deck.
After the screws have been removed, flip the
system over and take the top off.
Place the screws in a pile.
I like to put them in the top cover so I dont
get them confused with the other screws we will be
removing. You
will now see the guts of your NES.
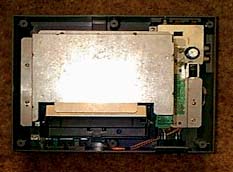
·
Remove
the screws that hold the silver RF shielding to the
system. Place the metal shield and screws on the
table off to the side (again, I usually put the screws
in the shield). Now your NES is practically naked.
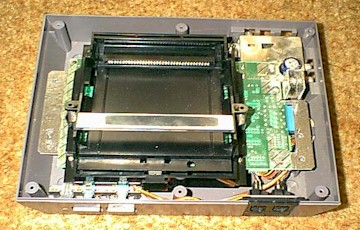
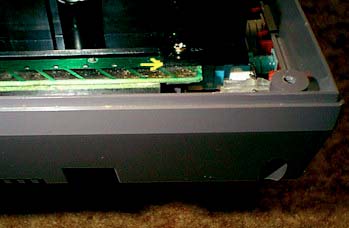
·
You
will see the cartridge tray (the thing that lowers
and raises when you insert a cartridge) and the pin
connector. Remove
the two screws from the front of the tray (front meaning
where the power button is).
Set the screws aside in their own pile and
remember where they are from.
·
Next
remove the middle pair of screws from the tray. Again, put them aside in their own pile.
Finally, remove the last pair of screws and
put them aside as well.
·
Grab
the tray, lift the front up a bit, and slide it towards
the front of the deck and place it off to the side
somewhere.
NOTE: This
is where it gets tricky, be careful!
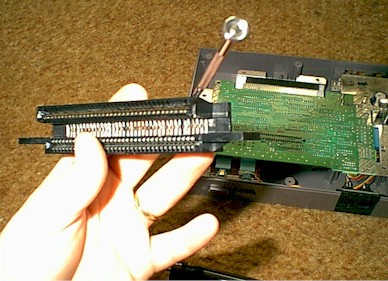
·
With
the front of the deck facing you, grab the LEFT side
of the main board and lightly pull it upward.
With your other hand, push the left side of
the connector off followed by the right side.
If the right side doesn't come off, pull the board
up a little higher. Just pull on the board GENTLY and take
your time. The
connector will eventually come off.

FOR CLEANING:
o Take
the connector and with warm soapy water (I recommend
soap that doesnt have lotions in it) and scrub the
connectors.
Rinse and then shake the connectors over a
sink to get as much water as you can out of the connector.
Then dry with a towel and then let it sit on
the towel (preferably connectors facing down) to dry
for a couple of hours.
NOTE: This
too is a little tricky.
·
The
pins that are going to be adjusted are the upper part
of the connector, where the cartridge actually connects.
It is also the largest end, so you cant mistake
it for the connectors that hook up to the main board.
The pins that touch the cartridge also have splits
in them (kinda like a hoof), so you can't mistake
them.
·
As
you look at the connector, take a mental note on the
gap between the pins and the plastic at the top of
the gap. You will want to bend the pins so that
pin takes just slightly half of the gap. Take
the precision flat head screwdriver and place the
head under the first pin on the right. Ever so gently, lightly pry the pin up
until (as said before) it takes up just shy of half
the gap. Its really hard to measure, but you will
be able to see the difference between the other pins
and the one you just bent (I couldn't take a good
picture of it). You dont want to bend the pins too far
or you will have a really hard time inserting and
pulling out cartridges.
·
Repeat
for each pin, raising it to the same height as the
first pin until all of the pins have been bent.
·
Hook
the connector back up to the main board.
Again, gently lift the main board and slide
the connector back on. You may have to rock the connector to
the left and right to help slide it on.
·
Take
the tray and slide it back onto the main board and
over the connector. You may have to slide the tray and wiggle
it while press down on it so that the tray "snaps"
into place. The screw-hole tabs will then be
flush with the main board. If the tray seems to be floating above
the main board, rock the tray left and right until
it snaps into place. Do not force it.
·
Replace
the screws for the back, middle, and front pairs of
screws for the tray and connectors.
Be sure you put the screws back in the same
holes you pulled them from.
·
Now,
hook the deck back to the power supply and the TV. Place a CLEAN non-battery save cartridge
(dont use a game like Zelda) into the deck (like
you would normally) and press Power.
DO NOT TOUCH ANY OF THE INTERNAL COMPONENTS
WHILE THE POWER IS ON!! The cartridge may slide in kinda tight,
so you may have to push harder.
You will encounter a varying degree of tightness
as not all cartridges are made the same (some carts
have thicker connectors than others). This will ease up with time.
o If
you get a picture right away, you have done a great
job. Disconnect the power and TV connections
and continue putting the deck back together.
o
If
you get flashing, clean the cartridge again.
If you still get flashing, turn the power off
and remove the cartridge.
Insert the cartridge again and power the deck
on. NES
decks can be touchy, even with refurbished or new
connectors.
o If
you still get flashing, try a different cartridge. If after four cartridges you still get
flashing, push DOWN on the cartridge itself. If you see the title screen appear, that
probably means the tray is not seated right. Power off the deck, disconnect it from
the power and TV, and remove the screws holding the
tray down. As mentioned above, move the tray around
until in snaps into place.
·
Replace
the RF shielding and screw it down.
·
Place
the top cover on the deck and then flip it over and
replace the screws.
Your deck has
now been refurbished.
As mentioned above, this method will usually
get the games working again, but NES by nature can
be a testy little beast.
Just be patient and insert/reinsert the cartridge
again. If
the majority of your CLEANED games dont work, try
them on a friends deck to see if they work.
If they work on other decks and not on yours,
there may be something more wrong with your system
that may require a parts replacement or you may need
to get a new (different) deck.
CONTROLLER: Youve probably noticed that at times
it seems as though the timing when hitting a button
to making the character onscreen react is off.
While some of the time its just imagination,
the controller may be getting some dead skin build
up under the buttons. As you probably know we shed
the dead layers of skin everyday and in the case of
NES controllers, the skin gets inside and over time
builds up. It
forms a barrier between the button and the contacts
inside. While a connection can still be made,
there is a slight delay, hence why it seems to always
work when we try to push the button through the controller.
The following will show you how to take apart
your NES controllers and how to clean them.
BEFORE WE START:
You will need the following tools:
·
Precision Philips
screwdriver: it can be the largest size in the pack
they usually come with.
·
Something small
with scraping ability: a flat head precision screwdriver,
a small knife, even a toothpick will work.
·
Lightly
moistened cloth: to wipe anything off the rubber contacts
if need be.
·
Dry
cloth: to dry off those little contact thingies.
Now we can
take the controller apart:
·
Remove
the screws from the back of the controller. Remove the back casing and set that and
the screws aside.
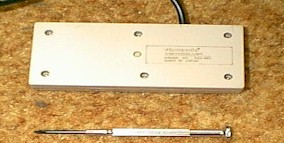
·
Carefully lift
the circuit board from the controller.
You will probably have to pull the wire from
the front casing to do with. Set the board aside.
·
Remove
the rubber contacts from the front of the controller. Check to see if they have any dirt buildup
and if they do, wipe them off.
Be careful not to tear the rubber.
While these are usually sturdy, years of use
might weaken some parts of the rubber.
Just be cautious.
o If
you see any tears in the rubber, you may want to either
seek out new controllers or perhaps a replacement
kit. The
controllers themselves are probably easier to find,
however. If you want to do the replacement, I know
a company called Game Doctors released a pad replacement
kit. But that was a long time ago.
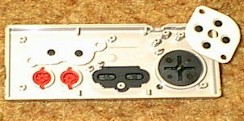
·
Remove
the plastic A and B buttons and scrape any dirt/dead
skin off of its bottom edge.
Wipe the button clean with the cloths afterwards
then place them back in the controller.
·
Remove
the D-Pad and wipe it clean.
Place the D-Pad back into the controller.
·
Replace
the rubber pieces on top of the buttons.
They should only go on one way, so there shouldnt
be any problems.
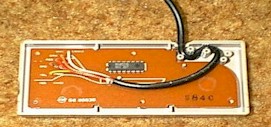
·
Take
the dry cloth and wipe the front of the circuit board. Then place it back into the controller.
Again there is really only one way it goes
in. Take
the wire that connects to the circuit board and carefully
snake it through the two pegs that lead to the hole
where the wire sticks out.
·
Replace
the back panel of the controller and replace the screws.
·
Now
do the same to the other controller.
Thats all there is to it.
By doing this you can add life back into your
deck. By
keeping the cartridges clean and then by regularly
cleaning your deck, you should be able to enjoy your
NES for quite some time.